Setup
LEDfx, in conjunction with the WS2812FX Arduino library, is used to create eye catching lighting effects using WS2812 programmable RGB LEDs. It is available as an Android app on the Google Play Store and as a web app hosted on this server.
- Open Chrome
- Navigate to the web app
- Click the grey padlock icon near the address bar and select Site Settings
- In the Privacy and Security section change the "Insecure content" setting to "Allow".
You will need:
- a strip of WS2812 RGB LEDs
- an ESP8266 microcontroller
- the Arduino IDE and ESP8266 platform package
- the WS2812FX library
- an appropriate power supply and sundry electronic components
I'm going to assume you have some experience with the Arduino IDE, ESP8266 and WS2812 hardware. If not, Adafruit has some nice guides for their NeoPixel products and instructables.com has useful articles that describe the ESP8266/WS2812 hardware setup. Pay particular attention to Adafruit's Best Practices guide (link). It will save you some headaches.
Install the Arduino IDE, ESP8266 platform and WS2812FX library as described on their web pages. We'll be using the ws2812fx_patterns_web sketch (included in the WS2812FX examples folder), which requires some configuration:
- edit the WIFI_SSID and WIFI_PASSWORD definitions to suit your local network.
- it's helpful to edit the datapin and numLeds parameters to suit your hardware setup, but this can be set later when configuring devices in the app.
Using LEDfx
The initial LEDfx screen is where your create your devices, which represent an ESP8266/WS2812 setup. They can be separate hardware arrangements or a single arrangement for which you want to create a collection of lighting effects.
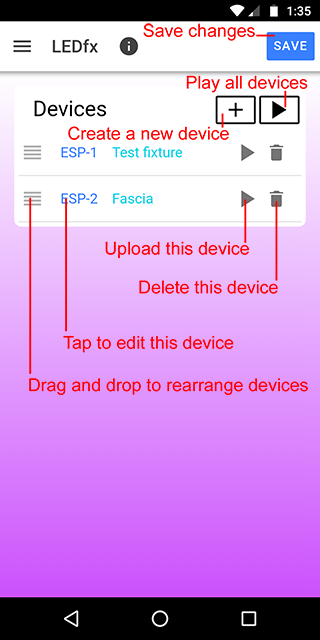
The screen shows several common elements that are used throughout the app.
- Devices are created by touching the plus icon (+). After the device is created it will show up in the devices list.
- Each device in the list has a drag-and-drop handle on the left, used to rearrange the devices in the list.
- The play icon (▶) is used to upload the device configuration to the ESP8266, so you can see your design in action. If you have multiple devices, you can synchronize them by tapping the Play All icon, which will upload and start all devices simultaneously.
- The trash can icon deletes a device from the list.
- The SAVE button will save any changes you've made.
To get started, touch the plus icon to create a device.
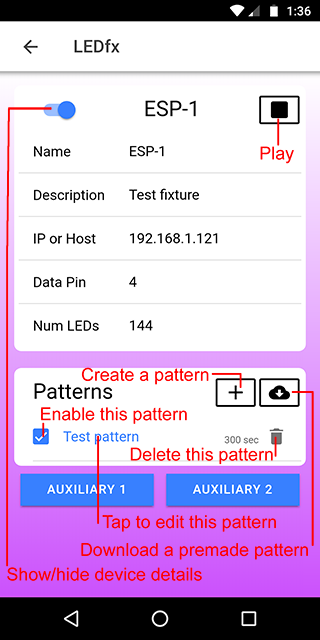
Here you give a name and, optionally, a description of the device. You'll need to enter your ESP8266's IP address, the GPIO data pin used to drive the WS2812 strip and the number of LEDs in the strip. If you haven't assigned a static IP address to the ESP8266, it's dynamically assigned IP address is displayed in the Arduino IDE serial monitor window when the ESP8266 is powered on. Note, the IP address can include a port number, otherwise the default HTTP port 80 will be used. Patterns created for a device will be listed on the bottom. Each has an "enable" checkbox, which can be used to enable or disable individual patterns.
Each device has two "Auxiliary" buttons, which can be used for user specific tasks like energizing a relay or turning on a MOSFET. To take advantage of the auxiliary buttons, add your custom code to the ws2812fx_patterns_web sketch's customAuxFunc[] array.
Now let's create a pattern by touching the plus icon.
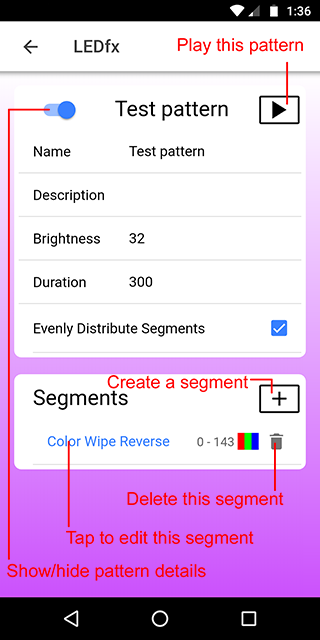
A pattern is a collection of segments that span the length of your WS2812 strip. Like devices, you give them a name, then set the brightness for each pattern and length of time (duration in seconds) the pattern will play before automatically playing the next pattern in the list. The "evenly distribute segments" feature will save you the trouble of manually setting the start and stop position of the LEDs in each segment of the pattern. With this checkbox checked, the pattern's segments will be evenly spread across the LED strip, i.e. if there are three segments defined, each segment will occupy a third of the LEDs in the strip. Segments created for a pattern are listed on the bottom.
So lets create our first segment by touching the plus icon.
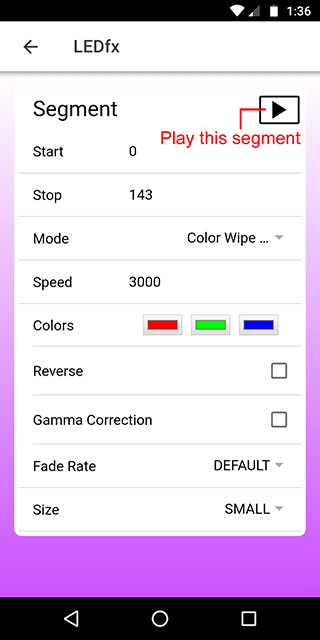
Here you specify the segments position in the strip by entering the start LED position and the stop LED position. Specifying the start/stop positions is not necessary if you've checked the "evenly distribute segments" checkbox previously. Then you select one of the 50 effects bundled with the WS2812FX library, the animation speed, the colors you wish to use for the effect and any effect options (see the WS2812FX User Guide for a description of the effect options).
That's it! You've created your first light show. Make sure you return to the LEDfx home page and press the SAVE button to save your devices/patterns/segments in the app. Then press the play icon to upload your creation to your ESP8266 and be dazzled. The patterns uploaded to your ESP8266 are stored in the microcontroller's EEPROM, so will persist even if it is powered off.
Firebase support
LEDfx can use Firebase for cloud storage to backup your hard work. Also, Firebase can be handy if you use LEDfx on multiple Android phones/tablets. Backup and restore your LEDfx data with Firebase and your data will always be in sync across all your Android devices.
To use Firebase go the Firebase Console web site and create an account, if you don't have one already. LEDfx stores a tiny amount of data, so their free "Spark Plan" provides more then enough cloud storage. You'll be storing your LEDfx data in a Firebase project, so go to the Firebase Console and click "Add project". Enter a name for your project and uncheck the Google Analytics box, since you won't need it.
Once the project is created, you'll need to create a storage bucket. Go to your project's "Storage" section and click "Get started". Select a storage location appropriate for your locale and create your bucket. The default rules for accessing your bucket enforce authentication, but we don't want that, so click the "Rules" tab and change your access rules to this:
    rules_version = '2';
    service firebase.storage {
      match /b/{bucket}/o {
        match /{allPaths=**} {
          allow read, write;
        }
      }
    }
and publish the change.
Next you'll create an app accessor for your storage bucket. Go to your project's settings and under the "Your apps" section click on the icon for the web platform. Enter a nickname for your app and you'll be presented with a javascript snippet that uniquely identifies your storage bucket and looks like this:
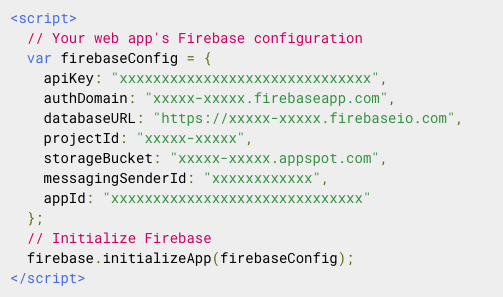
We're interested in everything between the curly braces of the firebaseConfig var, so copy all of that (including the curly braces) to the clipboard. Back in LEDfx, open the Firebase page and paste your configuration info into the "Config" field.
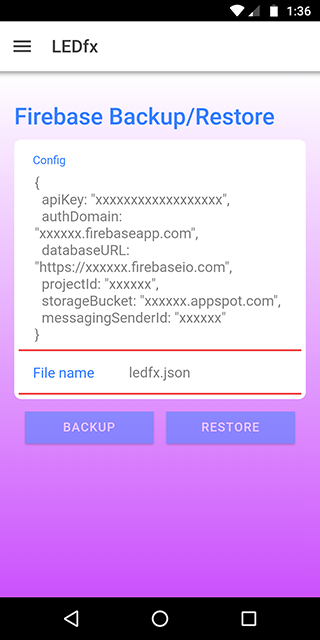
Then enter a file name for your LEDfx data. If you have lots of different LEDfx content, you can store them all under different file names in Firebase.
That completes the Firebase setup. You should now be able to press the Backup and Restore buttons to save/load LEDfx data to/from Firebase.